Address: Foshan,China                Phone:         +86 13809220755             Email: [email protected]
 [email protected]
»

How to Build Greenhouse Wet Walls for Optimal Plant Growth

Creating the perfect growing environment for your greenhouse plants is achievable with the installation of a greenhouse wet wall. This article will walk you through the process of building a damp barrier that effectively manages temperature and humidity in your greenhouse.

What is a Wet Wall

Greenhouses can get very hot, so many growers use evaporative cooling to keep plants healthy. A popular method is to use a "wet wall," often referred to as a greenhouse wet wall, consisting of a small tank and a pump. A pump sends water to the honeycomb panels, which absorb the water and allow air to pass through. As hot air gets pulled into the greenhouse by exhaust fans, it travels through the greenhouse wet walls, significantly cooling before reaching the plant area. This straightforward and efficient system helps sustain optimal growing conditions for your plants.

While this is a simple and effective way to regulate temperature and humidity, it has drawbacks. One of the main problems is that cooling occurs along only one end wall, which can cause significant temperature and humidity variations between the wetted wall and exhaust fans located up to 100 feet away.

Greenhouse wet walls can be installed to maintain a healthy and pathogen-free environment inside the greenhouse. However, an ozone system can be added to ensure that the water that circulates through the system is free of harmful chemicals and pathogens. The design infuses ozone into the water, which then circulates through the wetted walls for chemical-free disinfection of pathogens. Additionally, a self-cleaning filter can be installed to remove any hardness in the water and capture any solids that build up in the recirculation system, such as algae. This ensures that the greenhouse remains a safe and healthy environment for plants.

pc-altaqua-greenhouse-wet-wall-How-to-Build-Greenhouse-Wet-Walls-for-Optimal-Plant-Growth-2
Table of Contents
show hide

6 Facts About Greenhouse Wet Walls

If you live in a hot, dry climate, greenhouse-wet walls can be a great addition to your gardening setup. This active cooling method uses evaporative cooling to lower greenhouse temperatures. It is especially effective in areas with low humidity, such as Australia and the Southwest. Wet walls can create a more comfortable environment for your plants and help them thrive even during the hottest months.

Greenhouse wet walls feature a honeycomb design made of cellulose material to prevent degradation and moss buildup. In addition, the unique design of the damp wall allows air to flow through the cooling pad, effectively reducing the temperature inside the greenhouse.

Greenhouse wet walls use gutters at the top of the wall to collect water that drips into collection pipes. The collected water passes through a filtration system before recirculating, making it an environmentally friendly and efficient way to cool the greenhouse.

Wet walls combined with exhaust fans can reduce greenhouse temperature by 10-15 degrees. Damp walls are on one side, extractors on the other. Air is blown toward the evaporating water, creating a cooling effect that regulates greenhouse temperatures. It is beneficial in hot, dry climates where maintaining a constant temperature is critical.

During the day, wet walls can keep greenhouses cool, while at night, natural ventilation can keep them cool.

This combination allows for efficient cooling while utilizing natural airflow to maintain a comfortable plant temperature.

Greenhouse wet walls are a standard cooling method used in large commercial establishments. While the initial setup cost can be high due to the basic plumbing and complicated setup required, the system effectively keeps the greenhouse cool. However, wet walls are not commonly used in smaller greenhouse operations due to cost and installation requirements.

Determine the Size and Location of the Wet Wall

Wet walls must be built in the right location and at the right size. You should get it right when it comes to your wet walls to maintain optimal temperature and humidity levels.

Consider these factors when sizing your wet wall:

Greenhouse size: The size of your wet wall should be proportional to the size of your greenhouse. A larger greenhouse will require a bigger wet wall to effectively maintain the desired temperature and humidity levels.

Plant types: Consider the types of plants you are growing and their specific environmental requirements. Some plants may need higher humidity levels, while others require lower ones. This will impact the size and efficiency of your wet wall.

Climate: The climate in your area plays a significant role in determining the size of your wet wall. If you live in a hot, dry climate, a giant damp fence may be necessary to provide adequate cooling.

Select the Location for Your Wet Wall

Access to water and electricity: Choose a location with easy access to water and electricity sources, as your damp wall will require both to function effectively.

Greenhouse layout: The location of your wet wall should be OK with the rest of your greenhouse setup.You should place it so it doesn't obstruct natural light or air circulation.

Sun exposure: To maximize the cooling effect of your wet wall, place it on the side of your greenhouse that receives the most sun exposure. In this way, heat generated by the sun will be countered and the greenhouse will remain more consistent.

Ease of maintenance: Select a location that allows easy access and maintenance of your wet wall. This will simplify cleaning, repairing, or replacing components as needed.

By carefully considering these factors, you can determine your wet wall's optimal size and location. Once you have a plan, you can start gathering materials and building your wet wall, ensuring a more efficient and productive greenhouse environment for your plants.

Choose a Suitable Material for Your Wet Walls

When building wet walls for your greenhouse, choosing the suitable material to ensure optimal plant growth is essential. Choosing waterproofing materials for your walls is the first step. PVC or copper pipes should be corrosion-resistant and able to handle high humidity. A water pump and thermostat are also needed to regulate the water flow and maintain the desired humidity.

Install a Water Supply and Drainage System for Your Wet Wall

Before building your wet wall, it is essential to establish a proper water supply and drainage system. This ensures that your damp wall has a constant water supply and that excess water is adequately drained, preventing any potential issues from water accumulation.

Water Supply: To install a water supply system for your wet wall, connect it to your existing irrigation system or use a separate pump. When connecting to your current irrigation system, ensure it has adequate capacity to supply your plants and the wet wall. If using a different pump, choose one with the appropriate flow rate and pressure capacity to meet the demands of your damp wall.

Water Distribution: Once the water supply is in place, you must set up a distribution system to evenly disperse the water across the wet wall. Depending on your damp wall design and materials, this can be achieved using PVC pipes, drip tubing, or spray nozzles. Ensure the water distribution system is designed to provide even coverage to ensure maximum cooling and humidity control.

Drainage: Proper drainage is critical for your wet wall to function efficiently and prevent water-related issues. You can connect drains to your existing gutter system or build a separate one for your wet walls. When designing your drainage system, ensure it can handle the water used and direct excess moisture away from the greenhouse foundation to prevent potential damage.

Leak Prevention: Ensure all connections in your water supply and drainage systems are properly sealed to prevent leaks. Regularly inspect and maintain these connections to ensure their integrity and avoid water waste or damage to your greenhouse structure.

Maintenance: Regular water supply and drainage system maintenance is crucial to keep your wet wall functioning optimally. Periodically check for clogs, leaks, or any signs of wear and tear, and address any issues promptly to ensure the longevity and efficiency of your wet wall.

Water and drainage systems can make your wet wall more efficient and productive. It will not only help maintain optimal greenhouse temperatures and humidity levels, but it will also improve the health of your crops.

Install a Fan and Ventilation System for Your Greenhouse

After constructing your wet walls, it is crucial to establish a fan and ventilation system to regulate humidity levels and maintain a healthy growing environment for your plants. A well-designed ventilation system can help prevent stagnant moisture pockets and mold formation, contributing to the overall success of your greenhouse.

Fan Installation: Installing a fan or a series of fans can help improve air circulation within the greenhouse, distributing the cooled and humidified air evenly throughout the space. This ensures that all plants receive adequate air exchange and prevents the formation of stagnant moisture pockets.

Ventilation: Besides fans, consider installing vents in strategic locations throughout your greenhouse. These vents can be either manual or automated, allowing for natural air exchange and preventing excess humidity buildup. Properly placed vents also help regulate temperature and maintain a consistent environment for your plants.

Monitoring: Regularly monitoring the humidity levels in your greenhouse is vital to ensure the effectiveness of your fan and ventilation system. Use reliable sensors and monitoring equipment to track these levels and adjust your fans and vents.

Maintenance: To keep your fan and ventilation system operating efficiently, perform routine maintenance, such as cleaning fan blades and vents, lubricating moving parts, and checking for any signs of wear or damage.

By using an effective fan and ventilation system, you can create an banlanced, healty and productive environment for your plants.

Monitor and Adjust Your Wet Wall for Optimal Plant Growth

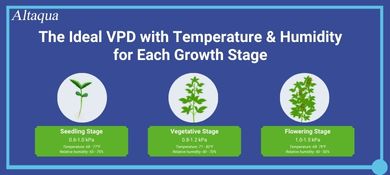
Building a wet wall is the first step towards optimal plant growth. Keeping your plants healthy requires regular monitoring and adjustment of humidity and temperature levels. To adjust your wet walls, you also need a hygrometer to measure humidity levels. Reduce the amount of water used on wetted walls or increase ventilation if humidity is too high.In a conservatory with low humidity, increase the water on the wet walls or add a humidifier. Monitor and adjust your plant's environment regularly to ensure they thrive.

Growing plants in greenhouses can be very hot, so many growers use evaporative cooling. An alternative method is to use a "wet wall," which is a tank with a pump. Water is pumped to honeycomb panels, which absorb the water and allow air to pass.

When hot air is drawn into the greenhouse by exhaust fans, it passes through the wet walls and is significantly cooled before entering the growing area. This simple yet effective system helps maintain optimal growing conditions for your plants.

Greenhouse growers often use wet-wall techniques to cool plants. Let the water run down the walls, evaporating, and cooling the surrounding air. This method is simple and effective, but has drawbacks.

One of the main problems is that cooling occurs along only one end wall, which can cause significant temperature and humidity variations between the wetted wall and exhaust fans located up to 100 feet away.

FAQ

1.What is a greenhouse wet wall?

A greenhouse wet wall, also known as an evaporative cooling wall, is a wall designed to cool the greenhouse. It consists of a water-soaked pad that cools incoming air as it evaporates the water.

2.What is the best cooling system for a greenhouse?

The best cooling system for a greenhouse depends on the local climate, but evaporative coolers are often effective. They use water evaporation to cool the air and increase humidity.

3.How much does a greenhouse cooling pad cost?

The cost of a greenhouse cooling pad varies depending on its size and materials. As of my last update in September 2021, a typical cost might be between $100 and $500.

Share with your friends:

Popular Blogs on Altaqua:

Download Catalogue

Get HVAC Brochure
»

Get HVAC Brochure?

Altaqua Form 1